LisaLimited's Posts
Nairaland Forum / LisaLimited's Profile / LisaLimited's Posts
(1) (of 1 pages)
The Brazilian Knott technique for attaching your hair extensions is one of the best applications I have ever seen. Check out this video for a quick demonstration of how it is done. https://www.youtube.com/watch?v=TigmQ9kCSpM |
Reusing your premium quality hair extensions to make your own clip in hair extensions, why not? Please see my latest video tutorial https://www.youtube.com/watch?v=rdMM1vmGFqc&t=325s |
Check out my new video on lace closures on youtube. Click on the link: https://www.youtube.com/channel/UCnT88j2NAdu7xFqUP6-NRZQ |
Remy Clip-in Hair Extensions, The Secret to Beautiful Hair Posted on November 6, 2016 by Lisa Limited There are many types of hair extensions in the market today, but the clip-in hair extensions stand unreplaced. These strong and efficient clip-in human hair extensions are made from the finest quality Remy hair to give you naturally beautiful hair with minimal damage. Our Remy hair is made from the finest quality of human hair. We carefully preserve the cuticle of the human hair and precisely align the strands in one direction to create the perfect, sleek and beautiful, natural look that you so desire. The extensions are prefixed with a specific number of clips. These may be five, three or two, depending on how broad you want your extension to be. The clips are then adjusted in your hair to give you naturally buoyant locks that draw attention wherever you go. Many women choose this type of hair lengthening technique to enhance their hair game. Due to the extreme ease of application, you can easily put them on for an occasion or for the weekend, as you please. The extensions immediately work to magnify your volume and provide excellent coverage. What’s more, you can use the Remy clip in hair extensions to make intricate hairstyles for your night out as you desire. Not only this, we at redpopo.com offer a range of quality extensions in a number of colors to choose from. Besides the usual color scheme, including the brunette and the blonde clip in hair extensions, we also have ombre hair extensions. Clip-in hair extensions have always been in demand and no doubt when they offer you security and beautiful hair at the same time, anyone would want to use them to their benefit. The great thing that these extensions are available for a number of hair types also, clip in curly hair extensions, clip-in straight hair extensions and much more to suit every hair need perfectly. How to apply the Remy Clip in hair extensions image2metal-clips The application procedure is simple and straight forward which makes using these extensions so much easier. What’s more, the extensions work for varied lengths. There are even hair extensions, clip in for short hair, clip in hair extensions for African American hair and many other types. You may think it’s hard to apply these extensions, but in reality, it is very easy. All you have to do is follow our step by step guide, and your extensions will be up in no time. Step 1 Part your hair in the horizontal between the tips of the ears. Secure the upper section to allow for easy application in the lower one. Step 2 Start making a section of hair about an inch from the hairline. Make the appropriate number of sections for the number of clips. Step 3 Separate the sections and put in small elastics that help the extensions stay put. Step 4 Start by attaching the middle clip to the middle section, slightly below the roots to allow for a better fit. Attaching the middle clip first will help stabilize the hair extension and help in fitting it perfectly. Step 5 Attach the clips to the consecutive sections on the right and left as well. Cover them with your hair and give it a flick. You are good to go! to see it properly, please go to redpopo.com or visit us on Facebook https://business.facebook.com/LisaLLimited/?business_id=345808829089206 |
lovelygurl: Rlly? Why do you say that? I think you need to be tall to wear that dress |
First Lady of the USA, Michelle Obama slays it in a Versace gown at her last state dinner. Absolutely gorgeous, she is the First Lady of Style. What do you think?
|
TrapQueen77: |
Lovely Ladies....the question is: Kylie - Fashion Victim or Fashionista With all the hype around her make up line, especially her lip kit, what's your take on it? The colors are certainly not your mom's red lipstick! Check ut the pics and let me know what you think.
|
I hope you enjoyed the first 6 tips yesterday. Here are the rest: 7. Beauty matters. Polished hair and make up elevate any look 8. Layer A great jacket is your best friend 9. Dress up your denim. Denim is not just for flip flops and t-shirts! 10. Buy timeless outerwear. A classic trench coat never goes out of style. 11. Match your shoes and bag While not a fashion faux pas to not match, match ing gives your outfit a classic timeless and elegant feel. 12. Avoid prints except Leopard. Prints are the easiest way to make any outfit tired. It is also the fastest way to date an outfit. That's it for a polished and expensive look without the high price tag! Tell me what you think. 1 Like |
The latest installment of Lovely Ladies 12 Tips to make your outfit look expensive. If you don't have an unlimited budget but you want to look good, then follow these 12 tips to WOW! 1. Get it Tailored! You've just bought an amazing new dress off the rack at your favorite store. A little nip here, a tuck there will take it from nice to AMAZING! 2. Make sure everything is freshly ironed. Nothing says cheap like wrinkled cloth. Fresh and crisp elevates your look to the next level. 3. Add Gold accessories. Nothing says expensive like gold. A statement necklace, a great pair of earrings or a gorgeous bracelet. 4. Dress in one tone. Dressing in all white or all black or any color gives you a classy look. 5. Add a belt and tuck in your shirt for polish. A tucked in shirt always gives you a better silhouette and a belt just finishes your look. 6. Keep handbags shiny and clean. A great handbag needs to look like you care about it! Wipe your bag down and make sure its looking good. The next 6 tips coming tomorrow.... Stay tuned. |
It's time for Post #2 ladies Manicures Nothing says well put together woman quite like a great manicure. Let's face it, your hands are seen all the time. BUthow do we get that great look when we don't have time to get to the salon?? Or money is tight? Here are some great tips to get that great look. 1 Get your supplies together. To give yourself a gorgeous manicure, make sure you have all the right supplies. You might have to spend a bit up front, but next time you want to paint your nails, you'll already be covered. Get the following products: Nail polish remover Cotton balls or cotton swabs Cuticle trimmer Nail buffer Nail trimmers Nail file Cuticle or hand cream Nail polish Base coat Top coat 2 Set up your workspace. Nail polish and remover can damage many surfaces such as cloth, wood finish and plastic. Wear an expendable t-shirt and no valuable accessories, sit at a desk or table, and protect it with scrap paper (not newsprint, which smudges). Make sure the table itself and anything near it is not particularly valuable or important to keep perfect because there might be a spatter or spill soaking through. You might not want to work near a computer, for instance. 3 Remove your old nail polish. Use nail polish remover and cotton balls or swabs. Some kinds of nail polish remover may dry the areas on your nails and around them. You may wish to find one that doesn't do this as much, but do not be concerned unless you have a severe allergic reaction. If you have and wish to keep fake nails, such as acrylic, choose a polish that will not remove them, and don't let it soak much. Unless you use it once a month or less, don't use a nail polish remover with acetone in it. Though acetone will make removing the nail polish easier, it can damage the nails themselves. 4 Cut and file your nails. Use nail clippers and trim your nails. Don't cut them too short; you should be able to see at least a little of the white tip still, all the way across. Using a nail file, file the nail and create a smooth and clean shape. Gently drag the file across the nail, rather than pushing it. Excessive force or sawing back and forth will weaken the nails and cause them to break. Pivot the hand with the file through each stroke to make a smooth curve rather than angles. Do not file them too short: just clean up any points or roughness left by the clippers. If you want to remove fake nails, perhaps because they look odd from having grown out too far, here's how to do that. Do not round the corners down into the sides of the nail bed. This can cause the nail to become ingrown. Be particularly careful with the big toe, which, perhaps due to shoes, is more prone to ingrowing. 5 Buff your nails. Using a white block of a stick-type nail buffer, or a pad-type nail buffer and buffing powder, buff the surface of the nail a little bit to even out the surface and to smooth out ridges. Remember not to buff too much; thinning it too much will weaken it. Perfect edge-to-edge flatness is not practical or necessary. A soft, flexible buffer will more easily buff the sides of the nail along with the middle. You may wish to buff your nails after pushing back the cuticles if there is some residue where the cuticles used to cover, in order to scrape or grind it off in the process. Being thin, soft, and not firmly attached, it should come off easily. 6 Soak your nails. Get a bowl or stopper the sink and fill it with warm (not hot!) water and a few drops of soap. Soak your hands only for a few minutes. The water and soap will help to loosen dirt, dead skin, and any dust left over from filing and buffing, and soften cuticles. Use a nail brush to gently clean your nails and the skin around them. Gently scrape under your nails if necessary to remove dirt. If you want your nails and cuticles really manageable, you can soak them in Dawn dishwasher soap. If you have dry skin or fragile nails you should not soak them; just rinse them. Don't go overboard with scraping, since you can damage your nails if you remove the white powdery substance that is actually part of your nails. 7 Prepare your cuticles. [/b]Dry your nails and apply a cuticle cream. Using a cuticle pusher, also called an orange stick, gently push back the cuticle. Do not force them back, and never cut your cuticles. Even if the equipment is sterile, removing the cuticle can cause infection and leaves the then-less-protected margin of the skin vulnerable. Wipe off the excess cream with a tissue or towel in the direction that you pushed. A small binder clip is great for pushing back cuticles. Make sure it's clean and well-formed, without sharp edges. Fold the wire grips to lay flat against each other. Hold the clip between the thumb and forefinger or middle finger by the flat metal sides, with the grips passing between in the direction of the little finger tip; the flat back piece extending past the thumb and forefinger. Now you're ready to push back the cuticles on the other hand (switch later to do the one currently holding the clip). 8 [b]Apply hand cream or lotion. Take a lotion or hand cream and massage it into your hands. If you have very dry skin use an intensive lotion, if not, any lotion will do. Be sure to rub it into and around your nails and let it soak in for 30 minutes or longer. This is as well done after painting the nails and allowing them to dry thoroughly as before painting. For very dry skin, apply some greasy lotion and sleep with cheap cotton gloves over your hands to allow it to remain on and work for a long time without keeping you from productive activities. Nail polish/lacquer will not stick to nails with moisturizer on them, so take a Q-tip dipped in nail polish remover and quickly wipe the nails to remove the lotion. Wipe excess remover off promptly to mitigate nail damage. Painting Your Nails Apply the base coat. Cover the nail with a clear base coat or nail hardener. This will even out and ridges and unevenness that may still be on the nail, serve as a primer for the polish, help the polish to last longer, and keep the color from staining your nails. This is the point at which you'd apply fake nails if you like. Let the coat completely dry before proceeding. Image titled Give Yourself a Manicure Step 102 Polish your nails. Pick a nail polish that you really like. Roll the nail polish bottle between your hands for about 10 seconds. Shaking the bottle causes air bubbles in the polish and makes harder for the polish to stick to your nails. Begin painting nails using a thin coat. Dip the brush into the bottle of polish and as you remove it, gently swirl the brush around the inside rim of the bottle to remove excess polish. Slowly paint a vertical stripe down the center of your nail, followed by another stripe on either side of the first. Try to paint all the way to the edge, but it's better to leave a small margin than paint the skin on the side. Angle the brush a little forward, press gently so the bristles spread out a little into a neat curve, and drag it gently and smoothly across the nail to paint it. Do not apply a blob of paint to the nail and spread it around. Blobs or runs mean too much paint or painting too slowly; subtle ridges should smooth themselves out under gravity (self-level) but very-thin spots mean too little paint or too much pressure. Fancy designs can be difficult, so stick with simple if it's important to get a good result the first time. If there is a little bit of nail polish on your fingers or around you nail you can use a toothpick (flat, not round and pointy, is generally best) to get it off if it's still wet. If it's already dry, dip a Q-tip in nail polish remover and wipe it away, or use a nail touch up pen, sold at most drugstores. Be careful not to touch the actual nail with the Q-tip or touch up pen, or you will have to redo that nail. Let your nails dry. Try not to move your nails too much or the polish may smudge. Wait 10 to 15 minutes for the polish to dry. If you apply a second coat too soon, it will only smudge the first coat. You may be able to speed drying with a fan, but don't be overly optimistic. By blowing the fumes away, the fan will remove one reminder of continuing wetness. After the first coat has dried, apply a second coat if you'd like. This ensures the color looks rich and even. After the color coats have dried, you may add designs, by brush, airbrush, mask or stencil, decal, rhinestones, or otherwise. Skipping the base coat, or even applying only one color coat (depending on the kind of polish and application technique; some give or appear to give more even color with uneven thickness than others), will often give acceptable results. However, extra layers add a little extra to initial surface quality. Apply the top coat. Finish with a clear top coat for a hard, smooth, scratch-absorbing, chip and flake-resistant shield particularly important for designs that don't cover the entire nail, as well as adding shine. Let it dry completely Have fun and enjoy your newly beautiful nails! If this helped you ladies and you would like to get more tips and tricks, join me on WhatsApp: +14165698065, or leave your number here and I will add you!
|
This will be a thread of all things Hair, Make-up, Fashion and Nails. Today's post we look at M.A.C. Cosmetics new line - Selina http://www.maccosmetics.com/collections-mac-selena Available in gorgeous purple limited edition packaging. The lip colours are highly pigmented with a smooth application. My favorite product is the Lip Glass in Bidi Bidi Bom Bom. A shiny gloss in a light pink that gives a hint colour and awesome shine. If you are lucky enough to score some of these hard to find products (the resales alone were huge and many stores have already sold out!), please let me know what you think!
|
Emeraldzs:add me +14165698065 |
Love her or hate her, this is a pic from Paris Fashion Week. She is at the Balmain show wearing of course.....Balmain
|
brandonobi:Yes she is. And what of the blonde hair? |
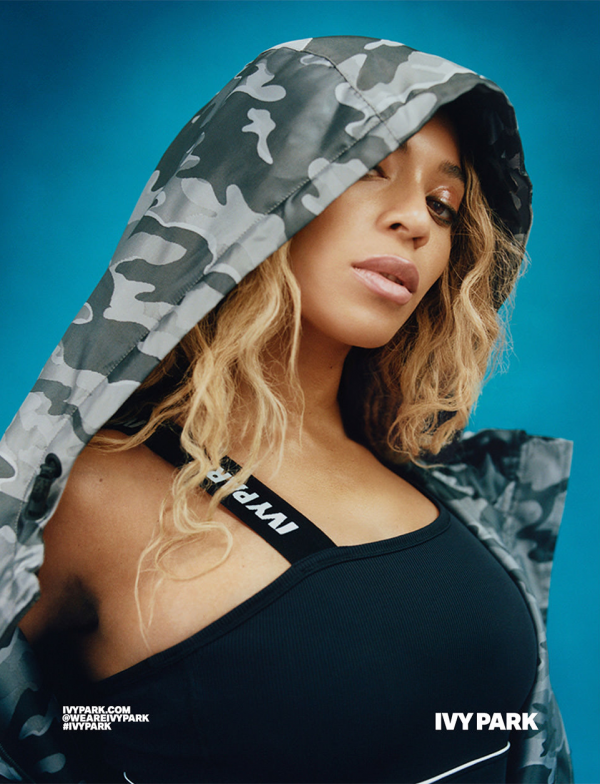
Beyonce is blonde and kicking it in her new line of athletic wear. Looking good Mrs. Carter. What do you think?? http://thatgrapejuice.net/wp-content/uploads/2016/09/beyonce-ivy-park-fall-tgj-600x784.png
|
I love this suit. What do you think?
|
glamorbabe: Nice colour, very feminine  |
BaffTheHairGuy:Her name is Kim Kardashian. She is huge in the US, known for her butt! Her style has gotten better over the years, sometimes she dresses with everything hanging out |
What is the one fashion trend you think is a must for this season? Let me know... |
No SEX?? Are you kidding me?? Nothing gets in the way of that. Measure properly or......I am sure there are other ways to make sure you don't miss out [/color]  [color=#990000] [color=#990000]  [color=#770077][/color] [color=#770077][/color] |
(1) (of 1 pages)
(Go Up)
| Sections: politics (1) business autos (1) jobs (1) career education (1) romance computers phones travel sports fashion health religion celebs tv-movies music-radio literature webmasters programming techmarket Links: (1) (2) (3) (4) (5) (6) (7) (8) (9) (10) Nairaland - Copyright © 2005 - 2024 Oluwaseun Osewa. All rights reserved. See How To Advertise. 60 |